
How To Design & Build Your Killer Bee Gi Custom BJJ Gi - STEP 1
Designing And Building Your Custom Gi
We have a new version of our custom gi builder out now and I thought it might be helpful to write a HOW-TO series of blog articles on the steps necessary to build and design your own BJJ gi. So lets start off with STEP 1.
Upon entering my website. You can scroll down until you see the product option. STEP 1 Design Your Gi. This is the main interface for building the look of your BJJ gi.

Once the product loads, look for the "CUSTOMIZE" button below the "ADD TO CART" button. Click that.
This will open up a screen interface which you will use to design your BJJ gi. You will see a blank white gi ready for you to choose the layout options for. To do so you will use the interface on the right of the uniforms. They are all stacked preset to basic WHITE.
2. On the right side of the screen there is a tool bar which displays four buttons for modifying the interface. I will go over what each one of those buttons do.

The stacked boxes on the far left represent the different layers of options for the custom gi. Base Color, Trim Color, Collar Color, etc.
The two lines stacked on each other represent TEXT layers. These layers will have words or text that you can add to the layout using the next button we will discuss.
The "A" icon is our "ADD TEXT" option. If you would like to have embroidered text you will click this button and then enter in the text you want. Later you will be able to modify the color, font, size, and more.
The last button on the tool bar, symbolized with a camera icon, is the ADD EMBROIDERY button which will allow you to upload graphic/image files you wish to use as embroidery.
Over the uniforms graphics on the main display there are three other buttons you need to know about.

Starting on the right we have the CLOUD button. Once you have completed your design you can use this button to download the image. Alternatively you can also just make a screenshot using your device if you prefer.
The DISK button to the left of the CLOUD button allows you to save your design in your existing internet session on our site. It will not save the design to your account. It is a temporary save while you are working on the page.
The last button to the left of the DISK button is the LOAD DESIGN button. You may want to experiment with several designs before you opt for your final one. This will allow you to load an existing saved design.
Now that we understand the MockUp Interface Tool, lets jump right into designing a BJJ gi.
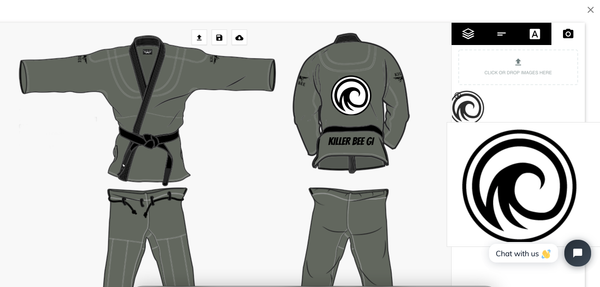
First we will begin designing the look of the gi. On the right hand side in the column with the many option layers begin selecting the color you would like. In the example below I have selected to build a gi with a base color of Military Olive Drab.

From the image above you can see that the base color has changed. Everyone of the layers in the stack represent an option that you can adjust. I will go through the rest of the options and select all the others to BLACK resulting in the image below.
For this example I chose all black highlights for the collar, stitching, drawstring, drawstring loops, Killer Bee Gi logo, pant/jacket cuffs, and jacket/pant vents.
If you do not want the Killer Bee Gi shoulder logo, simply remove the layer from the interface by clicking the "X" button next to the layer.
Next we are going to add a layer of Text Embroidery. Click the ADD TEXT button and then enter in the text you would like. I am going to enter the text "KILLER BEE GI".

Now you will see the text displayed in the main area where you see the uniform. See below.

As you can see the text I wrote has been included. There are also several options for editing this text which you may find handy. You can rotate the text, move it around the layout, resize , change its color, etc.
Once you have placed the text embroidery graphics you can upload the image embroidery graphics. Please keep in mind that the best results for embroidery rely on using graphics that are not overly complex. It should be a simple design with a limited number of colors. Below is an example of what will make a good illustration for embroidery.

In the below example I have added an embroidery file into the layout view by clicking the camera icon button. You can add as many embroideries as you like but keep in mind you will need to purchase them as a product in the next step.
Once you are satisfied with the layout of your gi you can exit out of the Mock-Up Tool by clicking the red DONE button at the bottom.
Each embroidery costs 15.00.
You can then add this layout to your cart and proceed to the 2nd Step where you build and verify the order based on your layout.
To read a review of our custom bjj gi's please read the review done by Meerkatsu.
Reach out with any questions via Chat or my cell phone. 540-903-2003
Jesse Bellavance
Owner KillerBeeGi